Source - View Binding
There are 2 methods of class and style binding. One method is based on changing a single class or style, while the other is based on changing multiple classes or styles.
- Single class - binding a single class.
- Single style - binding a single style property.
- Multiple classes - binding more than one class.
- Multiple styles - binding more than one css property.
- Assignment - the final assignment summarizing this lesson.
Changing a Single Class
Class binding syntax resembles property binding. Instead of an element property between brackets, start with the class prefix, optionally followed by a dot (.) and the name of a CSS class: [class.class-name]
@Component({
    selector: 'my-app',
    template: `
      <p class=" a b c " [class]="myClass">I use class binding</p> <!-- will replace a, b, c classes -->
      <p [class.extra-class]="someProperty">I use class binding</p> <!-- will add extra-class -->
      <p [class.extra-class]="true">I use class binding</p> <!-- will add extra-class -->
      <p [class.extra-class]="!someProperty">I use class binding</p> <!-- will add extra-class  conditionally -->
    `,
    styles: [`
      .extra-class { background: black; color: white; }
    `]
})

export class AppComponent {
    myClass = false;
    someProperty = true;
}
The property of "someProperty" (you can name this whatever you like) in the component class typically will be defined or not defined based on logic in your application. You can write any legal template expression.
Changing a Single Style
Changing a single style is very similar to the process of changing a single class. The only line that has to changed is the HTML defining the element in the template property of the component metadata.
<p [style.font-size.px]="bigSize ? '20': '12'">I use style binding</p>
<p [style.font-size.em]="bigSize ? '3': '1.5'">I use style binding</p>
<p [style.border]="myBorder">I use style binding</p>
<button class="my-btn" [style.border]="someProperty ? '5px solid yellow' : 'none'">Call to Action 2</button>
Note that a style property name can be written in either dash-case, as shown above, or camelCase, such as fontSize.
Changing Multiple Classes
If you want to append or remove multiple classes through class binding, you have to use a different approach. You must use the NgClass directive. Here's how you use it:
    //.. component metadata

     <button class="my-btn" [ngClass]="setClasses()">Call to Action</button>

    ,
    styles: [`
      .my-btn { font-size:1.7em; }
      .extraclass { background: black; color: white; }
      .anotherclass { font-weight:bold; }
    `]
})

export class AppComponent {

    someProperty = true;
    anotherProperty = true;

    setClasses() {
        let classes =  {
            extraclass: this.someProperty,
            anotherclass: this.anotherProperty,
        };
        return classes;
    }

}
We attach the [ngClass] directive to the HTML element. Then we specify a method such as "setClasses()". We then must define this method in our app component. "extraclass" will be added to the classes attribute of the HTML element if this.someProperty is defined, and the same applies to the anotherclass CSS class. Note: You can also use !this.someProperty
Changing Multiple Styles
The process for changing multiple styles is very similar to changing multiple classes. Instead of using the ngClass directive, we use ngStyle. Then we define the inline CSS property and value pairs based on the existence of multiple properties.
//.. component code

    <button class="my-btn" [ngStyle]="setStyles()">Call to Action</button>

//.. component code


//.. class code

    setStyles() {
        let styles = {
            // CSS property names
            'font-style':  this.someProperty ? 'italic' : 'normal',     // italic
            'font-weight': this.anotherProperty ? 'bold'   : 'normal',  // normal
        };
        return styles;
    }
Assignment
The following summarizes the materials in this lesson.
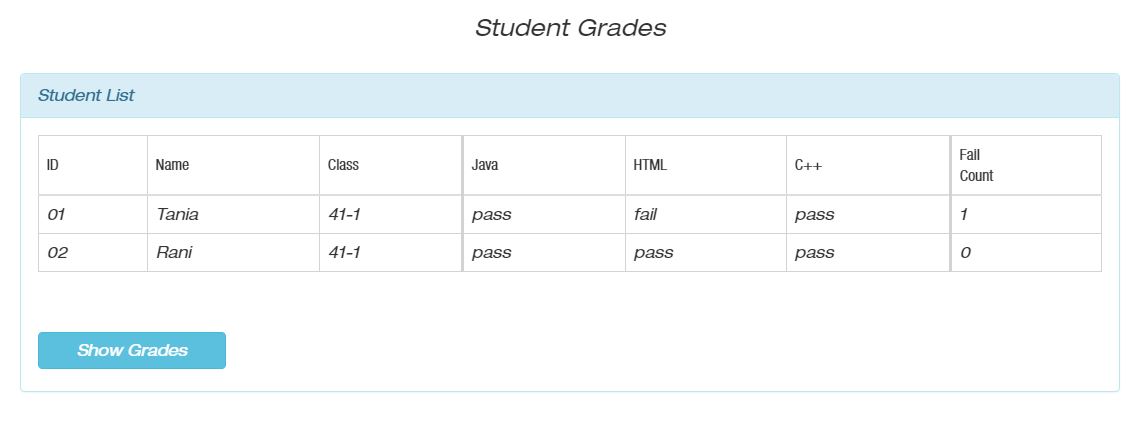
Generate a new project. The final page looks like:
Instructions:
You can find the project initial files here. It includes all the src files. You have to generate a new project and append the initial src files to the project. Then follow the instructions to add interpolation to the project.
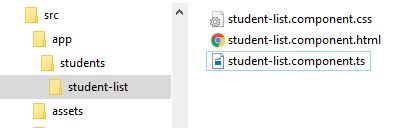
Under app folder we have students folder.
Under students folder there is student-list folder with the student-list component files.
- student-list.component.ts
- student-list.component.html
- student-list.component.css (if you wish)
The component class name is StudentListComponent. The component was generated using CLI 'ng g c students/student-list' in the application root folder.
The StudentListComponent component properties are defined as follows:
export class StudentListComponent implements OnInit {
  pageTitle: string = 'Student List';

  student: any = {
    'id': '123',
    'name': 'Tania',
    'class': '41-1',
    'grades': [100, 34, 85]
  }

  constructor() { }

  ngOnInit() {
  }
}
Change the student-list template in the component external template file. Replace the hard-coded values in the template by interpolation to display pageTitle and student data. To do this use StudentListComponent properties in the template. Note that fail grade is the grade under 55.
Solution:
Look for the result here.
You can find the solution files here. It includes all the src files. To run the solution, you have to generate a new project and append the solution src files to the project.