Source - View Binding
Property binding allows to define element property values from the component class. You pass data from the component class and set the value of a given element in the view. Property binding is one way, as you can only set data from the component to the view.
The benefit of property binding is that it allows you to control element property values from the component and change them whenever needed.
There are 3 ways to define a property binding in Angular. For example (imageSrc is defined in the class):
<img src="{{ imageSrc }}">
<img [src]="imageSrc">
<img bind-src="imageSrc">
As you can see the first option is interpolation. Interpolation is a convenient alternative to property binding in many cases. When setting an element property to a non-string data value, you must use property binding. If both ways may be used, [] is preferred.
Note that using the [] syntax binds to an element’s property, not the attribute. This is an important distinction, as properties are the DOM element’s property.
- Attributes initialize DOM properties and then they are done. Property values can change; attribute values can't (for example value attribute in the input box and the coresponding value property that can be changed).
- Property has a type and it is case sensitive; attribute is a string and it is case-insensitive.
Property binding makes it possible to use any valid HTML element property (such as the img src property, value property of the input box, ...). So, instead of binding the data to the attribute, you are binding data directly to the DOM element, and this is quite efficient. There is a way for attribute binding too (see in Angular documentation).
Assignment
The following summarizes the materials in this lesson.
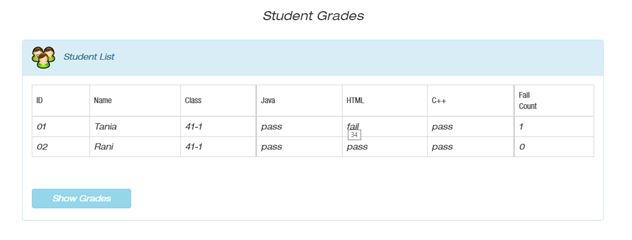
Generate a new project. The final page looks like:
Instructions:
The project initial files can be found here. It includes all the src files. You have to generate a new project and append the initial src files to the project. Then follow the instructions to add property binding to the project. Note that the initial files are the files of the final assignment in the previous lesson (interpolation).
We added to the StudentListComponent component the following properties:
studentIcon: any = {
"src": "assets/images/student-icon.png",
"alt": "student-icon"
}

showGrades: boolean = false;
Change the student-list template in the component external template file:
- Add the icon as shown in the final result. Use studentIcon class property for this task. Pay attention to the location of the image file (in assets).
- Add a title to each grade to show the actual grade when the mouse is over the grade.
- Another common use-case for property binding is on an input element's disabled attribute. Disable the button by setting [disabled] property:
<button [disabled]="!showGrades">
    <!-- Bind button disabled state to `showGrades` property -->
    Show Grades
</button>
Solution:
Look for the result here.
You can find the solution files here. It includes all the src files. To run the solution, you have to generate a new project and append the solution src files to the project.