Source - View Binding
Interpolation, which is called also string interpolation is one-way binding: from the source Class property to the Template view.
With interpolation, you write the expression using properties in the view template, enclosed in double curly braces. The expression inside the brackets is called template expression. Angular updates the display when the expression values changes. For example:
template: `
    <h1>{{title}}</h1>
    <h2>My favorite hero is: {{myHero}}</h2>
`
})
export class AppComponent {
  title = 'Tour of Heroes';
  myHero = 'Miki Mouse';
}
Changes in the title and myHero properties are automatically propgated to the DOM by Angular change detection, and the display is updated.
There are several rules you have to remember:
- Interpolation, i.e. binding with {{}} always converts the results of the bounded expression to a string.
- The expression is evaluated every change detection cycle (twice per cycle in development mode, and once in production mode). Thus, it must be simple, fast, and the value must be the same in the same cycle.
- Angular doesn't regenerate the entire view, but only change the required data.
- The expression can be any expression that is a string or can be resolved to string. There are some limits on the expressions you can use.
- No assignment, no =, ++, --, ... think as it is "read-only" of the component data.
- No multi-line/block/if/.... are allowed.
- Only a single expression is allowed.
- May have special operators: pipe ( | ) and elvis ( ? ).
<h1>{{pageTitle}}</h1>

<h1>{{'Title: ' + pageTitle}}</h1>

<p>The sum of 1 + 1 is {{1 + 1}}</p>

<h1>{{'Title: ' + getTitle()}}</h1>

<p>{{num > 100 ? "YES" : "NO"}}</p>

<h1>{{pageTitle | uppercase}}</h1>

<p>{{data?.question}} </p> // will be displayed only if already defined (helps with asynchronious data).
Note: Avoid writing complex template statements. A method call or simple property assignment should be the norm.
Assignment
The following summarizes the materials in this lesson.
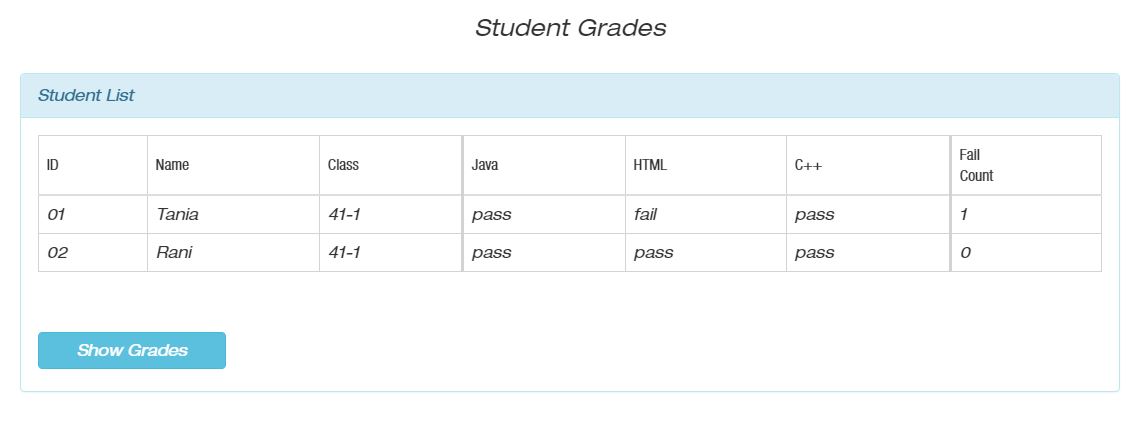
Generate a new project. The final page looks like:
Instructions:
You can find the project initial files here. It includes all the src files. You have to generate a new project and append the initial src files to the project. Then follow the instructions to add interpolation to the project.
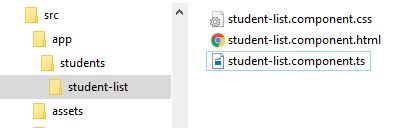
Under app folder we have students folder.
Under students folder there is student-list folder with the student-list component files.
- student-list.component.ts
- student-list.component.html
- student-list.component.css (if you wish)
The component class name is StudentListComponent. The component was generated using CLI 'ng g c students/student-list' in the application root folder.
The StudentListComponent component properties are defined as follows:
export class StudentListComponent implements OnInit {
  pageTitle: string = 'Student List';

  students: any[] = [
    {
      "id": "01",
      "name": "Tania",
      "class": "41-1",
      "grades": [100, 34, 85],
    },
    {
      "id": "02",
      "name": "Rani",
      "class": "41-1",
      "grades": [87, 100, 92]
    }
  ];

  constructor() { }

  ngOnInit() {
  }
}
Change the student-list template in the component external template file:
- Replace the hard-coded values in the template by interpolation to display pageTitle and student data. To do this use StudentListComponent properties in the template. Note that fail grade is the grade under 55.
- Add a method for fail count calculation and call it from the template. The method has to get as a parameter the appropriate student object.
Solution:
Look for the result here.
You can find the solution files here. It includes all the src files. To run the solution, you have to generate a new project and append the solution src files to the project.