In this lesson we will build a very basic component.
Table of Contents
- Angular Architecture
- Bootstrapping the Application - how the application is started.
- Components - component structure.
- Templating - ways to define component templates.
- Assignment - the final assignment summarizing this lesson.
Angular Architecture
Angular
Angular application has at least one Angular module called application root module. Every module has a set of components that are the building blocks of the application, and some services, that provide functionality across those components (common data and logic). Angular module organizes all together.
For each application we create module/s with components and arange them to form our application.

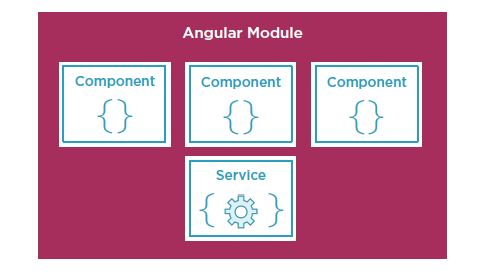
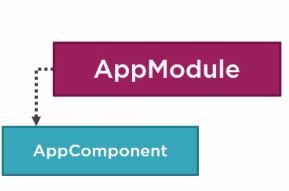
In this lecture we will concentrate on building a single module - application root module (AppModule). It has at least one component called application root component (AppComponent). AppComponent is the starting point of the application. AppModule will use some Angular predefined modules.
Bootstrapping the Application
When we generate a new project, Angular generates the application initial files.
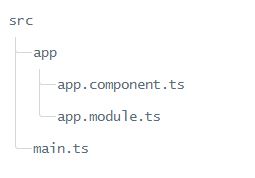
Generate a new project (by the ng new command) and look at the project files in the src folder. Files outside src/ concern building, deploying, and testing your application. They include configuration files and external dependencies. Files inside src/ "belong" to your application.
- index.html contains the main page for the application. This is often the only Web page of the application. Angular application is often called a Single Page Application (SPA). The user will see multiple pages.
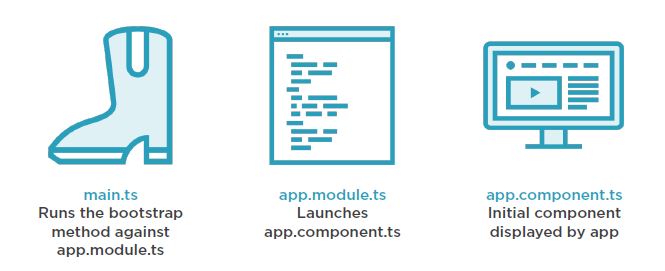
index.html contains <app-root>Loading...</app-root> code. app-root is a selector defined in the AppComponent. - ng serve process rebuilds the project and automatically attaches some scripts to the index.html (see them by inspecting the page using development tool). The scripts are executed and the first code that is executed is the code of the main.ts file. main.ts bootstraps the AppModule.
- Under the app folder you will find app.module.ts TypeScript file containing the AppModule. AppModule bootstraps the AppComponent. bootstrap() function used in app.component.ts file defines the entry point for the application. Beside AppComponent we can add additional components, which are required by the index.html at the time of bootstrapping.
- Under the app folder you will find the files of the AppComponent.
AppComponent is the starting point of the application:
The browser shows the HTML code defined by the app-root selector in the AppComponent file (application root component), and not the original code defined in the index.html app-root tag. Angular is a JS framework, changing the DOM (HTML) at run-time.

Change app.component.ts file content to the following:
import { Component } from '@angular/core';

@Component({
  selector: 'app-root',
  template: '<h1>My First Component</h1>',
  styles: ['h1 { color: navy; font-style: italic; }']
})
export class AppComponent {
}
Activate ng serve and check the display.
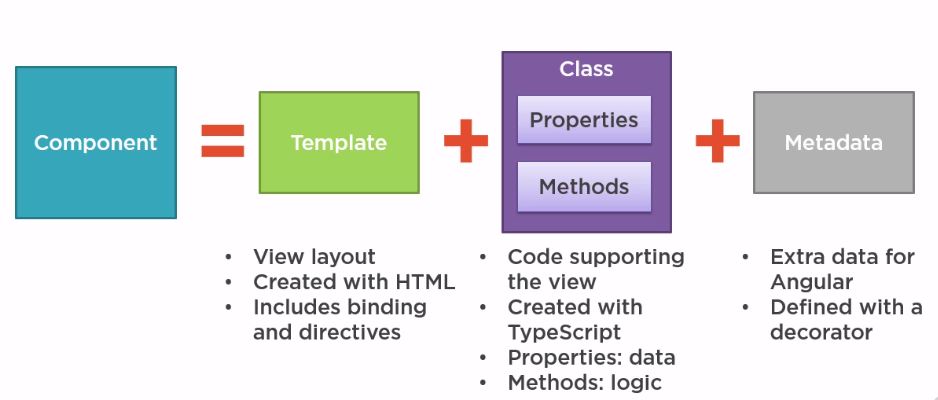
Components
Components are the building blocks of your website or application. Every component consists of three sections:
- Imports at the top of the component document. Imported classes can be from an the angular library, third party libraries or our own modules.
- The component decorator function that allows you to specify metadata associated with the component. Metadata tells Angular how to process a class. It is prefixed by an @ symbol. It has to be positioned immediately before the component class signature. It contains:
- selector - this is the name of the custom HTML tag that the component is applied to. For instance: <app-root>Loading...</app-root> within index.html. Selector has to be unique in the application.
- template - HTML with some help from Angular; extended HTML code defining a view of the component. Inside the regular HTML it may include some binding to other parts of the application or other Angular additions. They tell to Angular how to render the component.
- styles - an array of style strings associated with this component.
- additional information on the component.
- Class - TypeScript (JavaScript) code for the view. Class contains propertirs for the view and methods, which are the actions of the view. Class is exported, which means other modules (modules are simply files that import or export other members) can import this component.
Analyze the content of the app.component.ts file in the previous assignment.
You can choose to either create a component manually, or use the angular-cli to generate one for you.
- If you generate it manually, you have to create a folder for the component and the appropriate files (see templating below). Then the component has to be imported in the mosule that contains it. In our case AppModule (app.module.ts file).
- The easy way is to generate a component by using Angular CLI. It will generate the component folder, all the component files (4 files: CSS, HTML, TS (component class) and a .spec.ts file for unit tests.), and will import it to the app.module.ts. To generate a component use:
ng generate component component-name
Or by the shorthand:ng g c component-name
You must apply the command in the parent folder of the generated component.
Note: in this lecture we define the component selector as a new tag name which has to be unique. Selector can be defined in a few other ways. Selectors are like CSS selectors. They can be attribute selectors, tag selectors, class selectors, id selectors and combinations of these. We will use tag selectors only in this lecture.
Templating
You define a component's view with its companion template. A template is a form of HTML that tells Angular how to render the component. A template looks like regular HTML with some Angular extensions (will see it later).
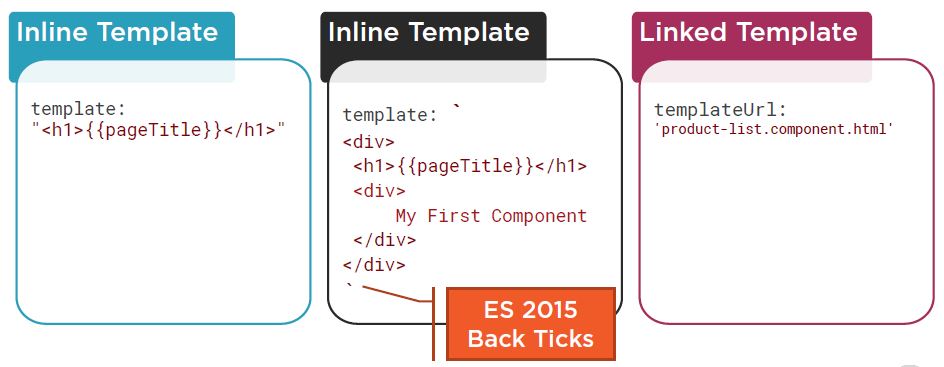
All components must define a selector, a template and styles in the @Component decorator. There are two ways in which you can specify both HTML and CSS.
- Using linked external html/css files
- Using inline html/css inside the @Component decorator
If your component only requires minimal HTML or CSS, it's best to use inline within the component decorator as it increases speed because it doesn't require loading an external file.
If your component consists of a lot of HTML or CSS, it is better to write it in separate files.
External HTML and/or CSS
It’s common practice to split a component’s code, HTML, and CSS into three separate files in the same directory. This is cleaner for a big code and also in a team with designers and several developers editing the same code. But this will result in an extra HTTP request per template. For external files, you have to use the metadata property templateUrl for HTML and styleUrls for CSS to define the location of an external HTML and CSS files. You can use a relative URL by prefixing your filenames with ./ like the following:
@Component({
  selector: 'app-root',
  templateUrl: './app.component.html',
  styleUrls: ['./app.component.scss']      // an array of stylesheet paths
})
Inline HTML and/orCSS
You can choose to write the HTML and CSS as inline strings (in single or double quotes) directly, within the @Component decorator data with the property template for HTML, and styles for CSS. It has the advantage that at runtime there is no extra HTTP request, but this method might not scale well for large templates/css. It also misses syntax checkings.
@Component({
  selector: 'app-root',
  template: '<p>My HTML Here</p>',
  styles: ['p { font-size: 1.2em; }']      // an array of style strings
})
If you wish to write multi-line HTML and/or CSS, you must change the single quotes ('') to backticks (``):
@Component({
  selector: 'app-root',
  template: `
      <p>My HTML Here</p>
      <div>More HTML here</p>
  `,
  styles: [`
      p { font-size: 1.2em; }
      body { color: #000; }
  `]
})
Final Assignment
The following summarizes the materials in this lesson.
Generate a new project. The final page looks like:

Instructions:
Generate my-header component. my-header component has to include the header with styling. Add my-header to the app component template. Note that in such a way we create nested component (my-header component inside app component).
Define all styles which are common to different application views in the src/styles.css file. Define header styles in the my-header component css.
Solution:
Look the result here.
You can find the solution files here. It includes all the src files. To run the solution, you have to generate a new project and append the solution src files to the project.