HTML5
Canvas
Learn & Practice
Learn & Practice
The HTML5 Canvas element enables you do draw graphics freely inside the bounds of the canvas element in your HTML5 page. With canvas you can create dynamic graphics and animations that can be rendered in an ordinary web page. Almost every modern browser supports Canvas.
The HTML5 canvas element itself is an HTML element, but the API you use to work with it, is a JavaScript API.
In simple words: we will have a canvas tag in HTML5 (our drawing surface), we will have a context (a paint brush), and we will use Javascript functions to draw on the canvas. Every thing can be drwan.
Canvas is a pixel based API. With hardware acceleration it allows intensive graphics experience. It supports tranformation, blending and clipping, animation and more. Canvas performance is very high. This is the reason of using canvas in games and complex drawings (where SVG is not).
Important: It is adviced to use polyfill for the advanced Canvas features that are not supported by some browsers (like path2D). For example look here (In npm look for canvas-5-polyfill).
The following shows how to define the Canvas.
<canvas id="myCanvas" width="400" height="200">
    If you can see this message, your browser does not support canvas
    and needs an update.
</canvas>
Width and height attributes determine the size of the canvas's coordinate system (viewbox). When no width and height attributes are specified, the canvas will initially be 300 pixels wide and 150 pixels high.
If we specify the canvas’s size by CSS, it just determine the actual size of the canvas element that will be drawn to the page (viewport). Thus, the canvas size (defined in the Canvas element) is scaled to the specified size. For example, if canvas width is 300 and in CSS it is 600, 300 canvas pixels correspond to 600 pixels on the display.
<script>
    window.onload = function() {
        var canvas = document.getElementById('myCanvas'); // var canvas = $('#myCanvas');
    };
</script>
Each canvas has its own context, so if HTML page contains multiple canvas elements, you must have a reference to each individual context that you want to work with.
<script>
    window.onload = function() {
        var canvas = document.getElementById('myCanvas');
        var ctx = canvas.getContext('2d'); // lower case '2d'!
    };
</script>
<script>
    window.onload = function() {
        var canvas = document.getElementById('myCanvas');
        var ctx = canvas.getContext('2d');
        ctx.fillStyle = 'red';
        ctx.fillRect(0, 0, 200, 100);
    };
</script>

Every canvas element has x and y coordinates. x being the horizontal coordinate and y being the vertical coordinate.
By default 1 unit in the grid corresponds to 1 pixel on the canvas coordinate system. The origin of this grid is positioned in the top left corner at coordinate (0,0). All elements are placed relative to this origin. So the position of the top left corner of the blue square becomes x pixels from the left and y pixels from the top, at coordinate (x,y).
We can translate the origin to a different position, rotate the grid and even scale it.
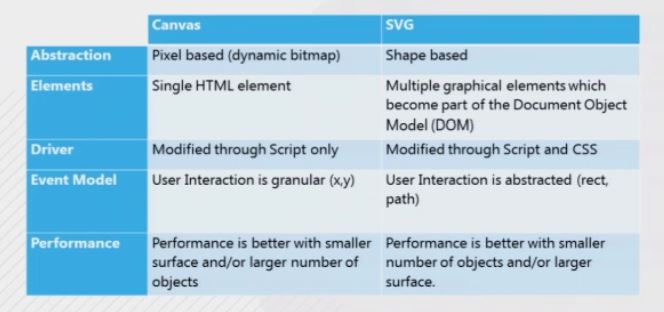
The following table shows high level differences between Canavs and SVG: