Table of Contents
In this lesson we will setup our project and build our first Angular application.
- Language and Editor - select the working language and the editor.
- Setup - install the appropriate packages to setup the application.
- First application - run your first application.
- Libraries - add third party libraries for the application.
- Deploy application - publish the application.
Language and Editor
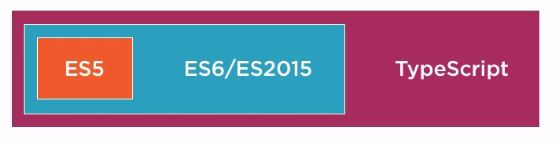
Several JavaScript compiled languages can be used with Angular:
- ECMAScript (ES5) - defines JavaScript old strandard.
- ES2015 (ES6) - is the latest JavaScript standard. Must be transpiled to the old JavaScript (ES5) if not supported by some browsers. ES6 defines many new features as classes, let, arrow function, ...
- TypeScript - TypeScript is superset of ES6, which is superset of ES5. In addition to ES6 features, TypeScript adds strong typing, syntax checking ... Thus, it produces less runtime errors because of compile-time type checking. TypeScript must be transpiled to JavaScript before using by browsers. Angular is written in TypeScript, and as a result, using TypeScript with Angular provides a seamless experience. Also the Angular documentation uses it as its primary language.
TypeScript will be used in this lecture.
Many editors support TypeScript (some with TypeScript extensions).
- Visual Studio Code - since TypeScript was developed by Microsoft, Visual Studio and Visual Studio Code are the best choices. Visual Studio Code is free and runs on different platforms.
- Sublime Text - Microsoft maintain TypeScript plugin for Sublime.
- WebStorm - has a very good support.
- Atom, Vim, Brackets - have plugins.
- More ...
Installation
There are a few different ways to get started with an Angular project. We will use the Angular-CLI (Command Line Interface) to install it. Before we can begin, you need to ensure you have a few dependencies installed.
- Node.js with NPM (Node Package Manager) - npm is the package manager for JavaScript. It allows to find and download libraries (or packages) and update the libraries by typing a command in the command line. It hosts almost half a million packages of free, reusable code — the largest software registry in the world. Use npm to install code into your project. Download from Node.js.
- Angular CLI (Command Line Interface) - see GitHub and CLI Quickstart
To check whether or not you have Node.js installed, visit your console / command line and type:
node -v
If this command goes unrecognized, you need to install Node.js. Go to Node.js, choose either the Windows or Mac installer based on your OS, and download it. By default, it will install the npm package manager which we will need.
After it's installed, close your console / command line and reload it. You can now run the node -v command and it will provide you with the current version number.
Next, we need to install the Angular CLI. This tool allows you to create Angular projects as well as help you with various development tasks. At the console, type:
npm install -g @angular/cli
To check that Angular CLI is installed type:
ng -v
When we run ng -v while inside an Angular project folder, it will also provide us with which version of Angular that particular project is using.
Typing just ng will give the options we can use with the ng command.
First Application
To start a new Angular project, at the console, type the following, wait for completion and go to the project folder at the console:
ng new my-project-name --routing
// wait for installation completion

cd my-project-name
The Angular CLI allows you to add a --style=option at the end of the ng new command. This allows you to add your favorite CSS preprocessor. For example, if you want to use SCSS, create the project by the following command:
ng new my-project-name --style=scss --routing
// wait for installation completion

cd my-project-name
Every valid CSS3 stylesheet is a valid SCSS as well. SCSS files use the extension .scss. In a similar way you can define a project that uses "less" or other CSS pre-processor..
Now serve the application by writing the following inside the project folder:
ng serve –-open
The ng serve command launches the server, watches your files, and rebuilds the application as you make changes to those files.
Using the --open (or just -o) option will automatically open your browser. Your application greets you with a message:
Welcome to app!
Notes on SCSS
To use SASS variables inside your project, you have to put your variables inside a seperate .scss file like _vars.scss. Notice the underscore in front of the name. This will tell the compiler that the file should not be compiled, which means you can only use it with @import statement. Then in your component.scss that uses these variables you can import at the top of your file:
@import "path/vars";
Where path is the relative path to _vars.sccs file.
There is no need to add the underscore nor the extension in the file name.
Libraries
Sometimes we need to load external global scripts or CSS files into our projects (for example Bootstrap, jQuery, jQuery plugins, ...).
A quick and easy method of integrating frameworks like Bootstrap or jQuery is to simply link to a hosted version of the framework (by CDN link) within the <head> tags of the index.html file located in the app folder. However this is good for production. During development state you can use the npm to install node packages that contain the files to these frameworks.
The Angular CLI has a configuration option to load such files. In the .angular-cli.json file you can find a styles and scripts option where you can add the file paths of any files you would like globally bundled with you application. Note that these files are bundled first before the rest of our module bundle.
Bootstrap
To include Bootstrap write the following command at the console ad the application root folder:
npm install bootstrap --save
Now open .angular-cli.json file at the root of your application, and in the styles section write:
"styles": [
    "../node_modules/bootstrap/dist/css/bootstrap.min.css",
    "styles.scss"
],
Note that Bootstrap uses jQuery. Thus, you will need to bundle jQuery too.
Normalize.css
If you don't include bootstrap, add normalize.css to your application by:
npm install normalize.css --save
Include it in your .angular-cli.json file in the style section.
normalize.css makes browsers render all elements more consistently and in line with modern standards. It precisely targets only the styles that need normalizing. Since bootstrap library makes use of normalize.css, it is not required while using bootstrap.
jQuery
It is not a good idea to use jQuery with Angular, since you have better solutions by Angular. However, there might be legitimate reasons for using jQuery, like using jQuery widgets and plugins that do not have a non-jQuery based equivalent. To include jQuery write the following commands at the console ad the application root folder:
npm install jquery --save
npm install @types/jquery --save-dev
Now open .angular-cli.json file at the root of your application, and in the script section write:
"scripts": [
    "../node_modules/jquery/dist/jquery.min.js"
],
To use jquery add at the beginning of the file where you use it:
import 'jquery';
Other Libraries
Check in npm search for the library you are looking for. Install it like Bootstrap/jQuery and add the appropriate files to the .angular-cli.json file.
Deploy Application
First remove libraries that you don't use, especially unnecessary scripts in your modules definition. Consider smaller alternatives to the libraries that you do use.
One of the tremendous benefits of the Angular CLI is the ability to create a production build of your application, along with AOT (Ahead of Time) compilation.
In the end, the ultimate goal is to create application that is as small as possible in file size. Run the following command in the console within an Angular project root folder:
ng build --prod
When you run the ng build command, it creates a /dist folder.
Update base tag in the dist/index.html file. Copy the files in the dist folder to your server.
Note: you can specify the --base-href flag during the build process based on the folder structure of where the application will be placed (if it has to be placed not at the root).